AmPeps: AmP Entry Prepare System

This page presents guidance for how to prepare an entry for Add-my-Pet (AmP); see also the course context.
An AmP entry has 4 source files:
- mydata_my_pet.m: Matlab function that sets 5 Matlab structures (data, auxData, metaData, txtData, weights) from scratch
- pars_init_my_pet.m: Matlab function that sets 3 Matlab structures (par, metaPar, txtPar) from metaData
- predict_my_pet.m: Matlab function that sets 1 Matlab structure (prdData) and a boolean (info) from (par, data, auxData)
- run_my_pet.m: Matlab script that runs a checking procedure and the parameter estimation procedure.
COLLECTION),
and the traits of the entry can then be compared with the many other AmP species with AmPtool.
The far-reaching automatization of AmPeps was only possible because DEB notation
is well standardized;
the code follows this notation as closely as possible.
Notice, for instance, that ap stands for "age at puberty" and tp for "time since birth at puberty".
The difference is obviously age at birth ab = ap - tp.
AmPeps only uses tp, not ap, to avoid that uncertainty in a delay in the onset of development, which affects ab,
also affects the prediction for ap.
AmPeps assumes that the leading name of uni-variate datasets identifies the type of data.
So tWw is an (n,2)-array with the interpretation of time (in d) and wet weight (in g) for the columns.
If more than one deta sets have this structure, append "_something", e.g. tWw_f for females and tWw_m for males.
Males are always given "_m" in names of variables; females have "_f" facultatively, and are taken to be the default gender.
Notice also that Lw is used in the predict file to specify physical length, as opposed to L for structural length.
Since the latter cannot be measured directly, the mydata-files uses L for physical length:
one of the many differences between the real (in mydata) and the fantasy (in predict) worlds.
It pays to keep them well-separated.
AmPeps uses system-function wget to copy (parameter) files from internet addresses.
This function is part of Windows 10, but for other Windows versions, it can be downloaded from
GNU.
Linux users might want to use .wgetrc and add the line:check-certificate = off.
Don't forget to set a path to the downloaded wget so that the OS can find it.
Mac users can download it in a way described here;
AmPeps sets a path to /usr/local/bin for Mac, where the copy of wget will probably arrive.
If AmPtool is installed and internet connected, you can test to proper working of wget by typing global eco_types; get_eco_types;
eco_types.climate in the Matlab window;
you then should see a list of codes.
Make sure that you downloaded the latest versions of DEBtool_M and
AmPtool from GitHub and stay internet-connected during the AmPeps session.
Start Matlab and Set Path in Matlab (located in the toolbar at the top of the Matlab window) to DEBtool_M and AmPtool, including subdirectories.
Then cd to a directory where you want to create the 4 source files.
Make sure that the current directory has no files which name start with "results_".
AmPeps has 2 phases: the initiation phase and the post-editing phase.
AmPeps initiation phase
The initiation phase writes a proposal for the 4 AmP source files, using Matlab function AmPeps; these 4 files might still require post-editing. They are not written directly, but via structures calleddata, auxData, metaData and txtData,
which are produced by the user-interface AmPgui, see figure.
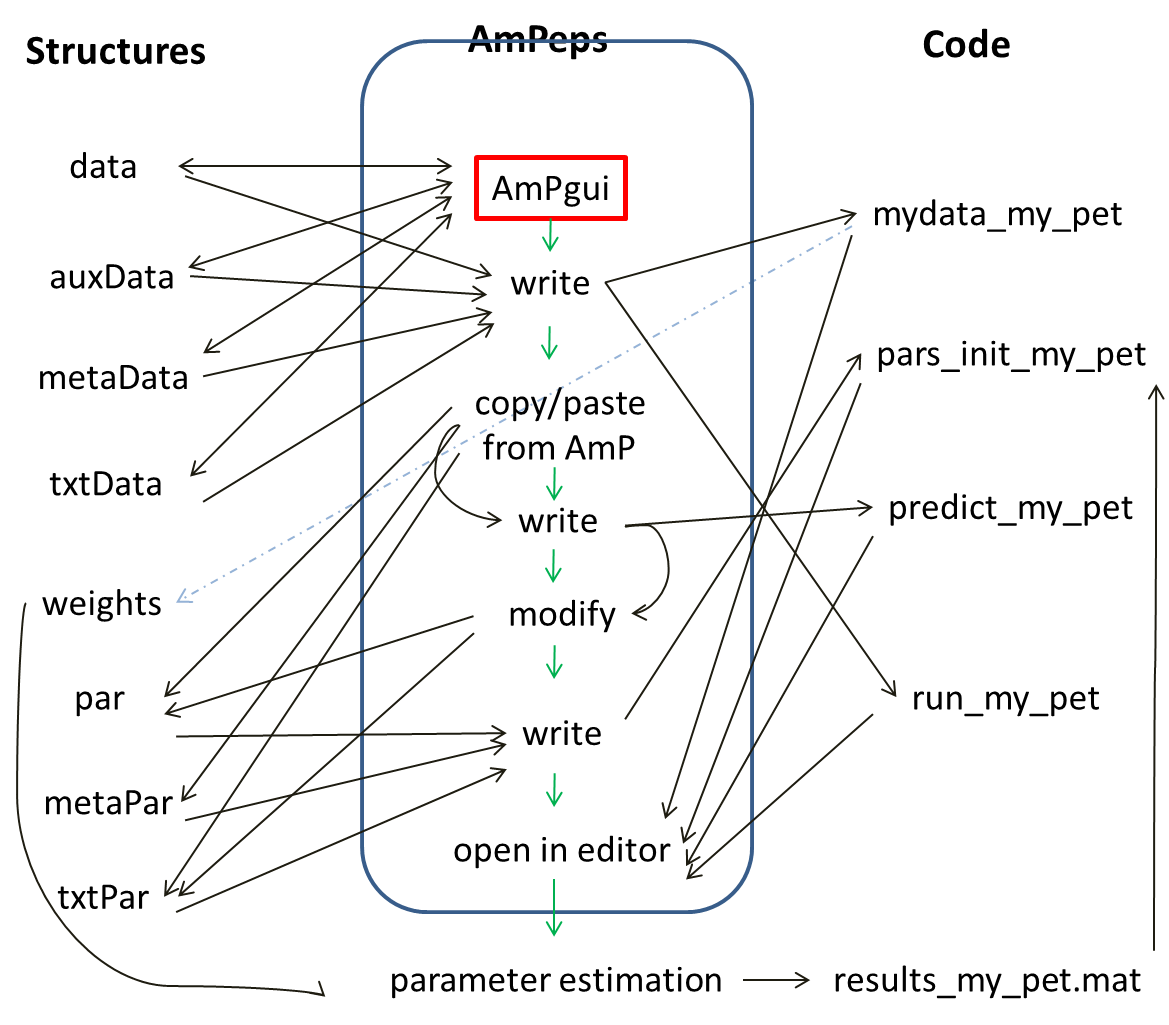
AmPeps first starts the graphical user interface AmPgui, to fill the fields that are needed for the mydata-file,
then writes the run-, pars_init-, and predict-files.
A large structure prdCode with Matlab code for the various data-types for all
10 DEB models is used to compose the predict-file.
Each DEB model has a set of required
core-parameters,
which might be augmented with auxiliary parameters, depending on the types of data that need to be predicted, as specified in the mydata-file.
These auxiliary parameters might or might not be present in the pars_init-file of the most related AmP species that is used as seed to start estimation.
The missing ones are taken from a structure auxPar.
This is why the logical structure is not very simple.
This setup of writing Matlab source files from structures automatically allows that one can prepare the latter on other platforms, such as R, and still use AmP's parameter estimation and database.
First create an empty folder, cd in Matlab to that folder and type AmPeps in the Matlab command window;
it first opens this page and the AmPeco-page for guidance, shows 4 figures that help in completing eco-codes and starts
AmPgui;
The appearence of the dialog window might take a while.
During the AmPeps session you will see various dialog-windows to edit; proceed by hitting the "OK" button and end the session via pause/save.
When running AmPeps, hitting windows on the screen to bring them to the front is blocked, but you can do it via the taskbar (see figure)
and start other processes from the start-button, e.g. to copy information for pasting in AmPgui.
The Matlab window might report useful info during the session; the dialog windows can be moved on the screen.
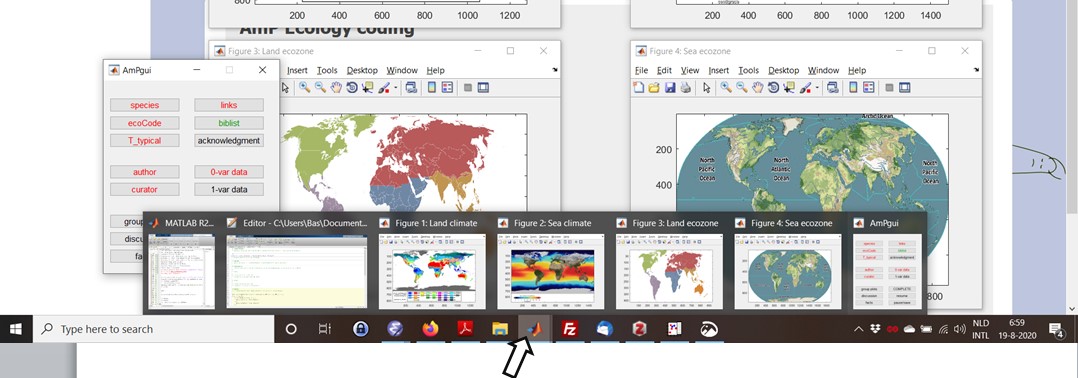
Alternatively you can toggle Alt+Tab to select windows or use Cascade windows.
.
AmPgui: the graphical user interface of AmPeps
The main dialog window of AmPgui shows font colours for each topic, green means OK, red means that further editing is required, black means that editing is facultative. The topic "discussion" shows black at the start (discussion points are generally facultative), when there are no discussion points, but if you add a data set for males for instance, it can become red, since you are supposed to add a discussion point that explains in what parameters males are supposed to differ from females. AmPgui does not read the discussion points, so it does not know if one of the discussion points actually deals with this topic. It is important to realise that these colour indicators only reflect internal consistency, not e.g. if the data contain enough information to estimate the parameters, after AmPeps has done its job. You should specifiy at least one zero-variate data set to proceed with AmPeps, but a single data set only allows the estimation of very few parameters, if any. The red crosses in the various dialog windows mean "delete" without an undo-option.You can edit the various topics in any sequence, but the preferred sequence of completing topics is to start with "species" (for reasons explained below), then "links" (because the sites can help to know where the species occurs, which you need to complete "ecoCode"). Fields like "COMPLETE", "group plots", "discussion", "facts", and "biblist" can only be fully completed after all data are filled. The next subsections deal with the various buttons on the main dialog window of AmPgui
pause/save & resume
AmPgui allows that you take a pause (even followed by quitting Matlab) and later resume the session. This pause-action stores a results_my_pet.mat file in the current directory (with "my_pet" replaced by your species), and the resume-action loads it again, on the assumption that the current directory has no other "results_" files (since the name of your species is not known by AmPeps at resuming). Resume is only functional if you saved data in a previous session and data in the active memory got lost (e.g. by quitting Matlab). As long as you do not leave Matlab (or useclear all), your work will remain available in the structures (see figure below), even without "save".
After hitting pause/save you have 3 options for continuation: (1) just continue without any consequence other than that data was saved (e.g. for security reasons),
(2) leaving the user-interface and proceeding with AmPeps or (3) quitting AmPeps and resume later.
Use of option (2) might have the consequence that AmPgui detects that essential data is missing and will op the reqired dialog windows.
The Matlab window describes what items are missing.
After AmPgui is left and AmPeps passed checks for completeness of fields successfuly, it modifies structures data and metaData, such that AmPgui can no longer use them.
For this reason AmPeps copies results_my_pet.mat to results_my_pet_backup.mat before these changes are made.
If AmPeps is restarted for some reason and resume is hit with both results_my_pet.mat and results_my_pet_backup.mat in the current directory,
AmPgui proceeds with the latter file.
species
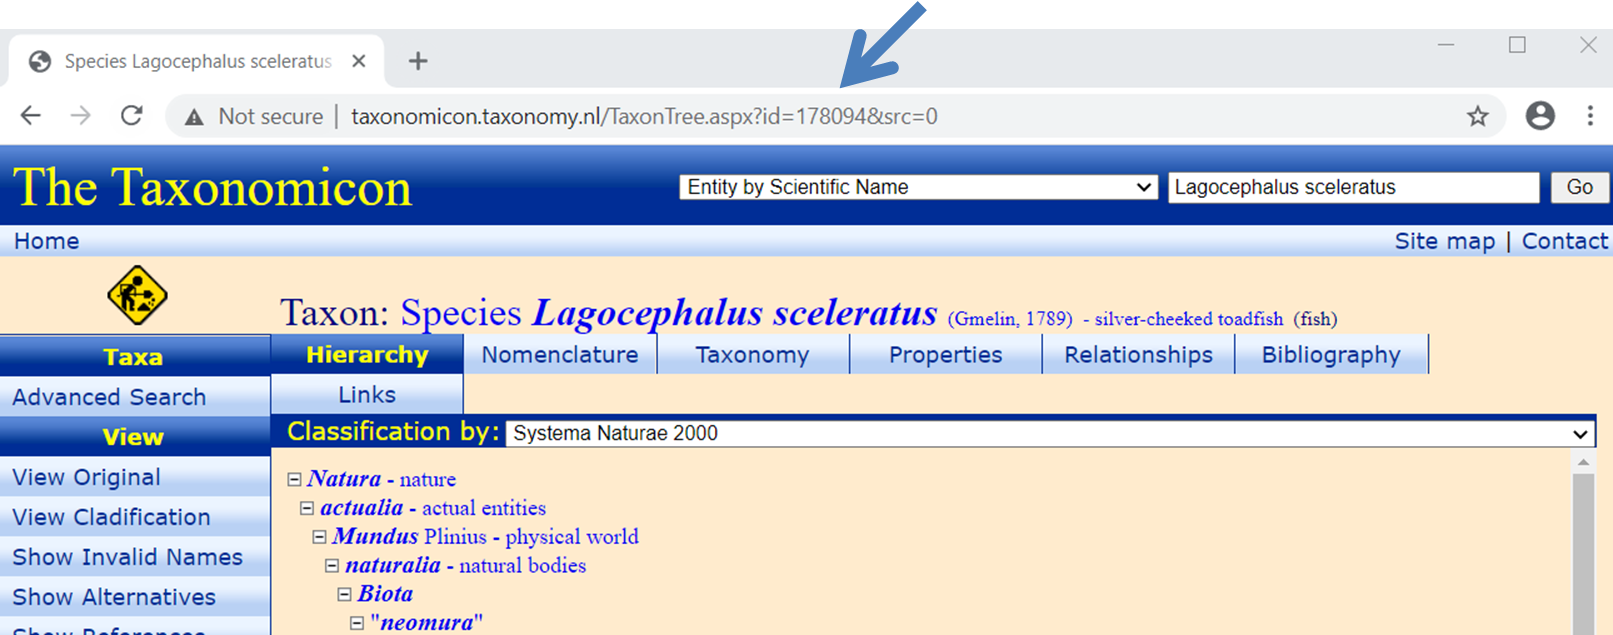
AmPgui assumes that you start with filling the species-field. It first checks if your species is already in AmP and, if so, it assumes that you want to prepare a new modification and you are asked to exit AmPgui and proceed to the post-editing phase. Any data that has been filled in this AmPgui-session then becomes lost, which is why you better start with filling the name of the species. If the species is not in AmP, it searches the name in the Catalog of Life website (CoL). If not present in CoL, it opens this site for selection of the proper name; please select the accepted name, not a synonym. Copy the proper name of the species into the species-field of AmPgui. AmPgui fills the lineage and the common name (if present in CoL) automatically. If completed sucessfully, AmPgui continues with "links".In the unlikely case that the spelling of the species name was correct, but it does not occur in CoL, you have the option of completing the lineage manually, but AmPeps helps as much as possible (also to reduce the risk of typos and some classifications are ambiguous). If the genus (i.e. the first part of the species name) is in AmP, you can leave the whole lineage empty, since AmPeps will know the lineage. If the genus is not in AmP, but the family is, for instance, the rest of the lineage (order, class, phylum) is completed automatically, overwriting any fields that might have been filled.
The linage is essential to determine the set of most related AmP species to copy seed parameters values from and to get the model type that should be applied. Moreover the lineage determines default values for e.g. the dry/wet weight ratio and the type of nitrogen waste. Dry/wet-weight ratios are used to estimate the specific cost for structure, [EG], which is a core-parameter in all DEB models. The type of N-waste is used to predict e.g. respiration rates.
This all might take a while, please be patient and wait till the dialog window disappears.
links
You are asked to complete identification-fields for a number of websites that relate to your species (so not the whole address). All fields are already completed whenever possible, but the ones that could not be found are empty. You can possibly find your species in the missing fields under different names using the search engines of the sites. Else just hit OK. See figure.
AmPgui automatically fills the identification field for CoL.
Double-click on the number to copy-paste
(Ctrl-c, Ctrl-v).
The main role of links is to determine the identity of the species through the labyrinth of changes in names and ideas on taxonomic relationships. They also provide important back-ground information of the species, and frequently have pictures.
ecoCode
Hit the "edit" buttons to edit fields.
Since details matter, the filling of the codes is from selection lists; you can make multiple selection by pressing ctrl.
The naming of the codes is standardized and given on the page AmPeco,
which is why this page was already opened by AmPeps.
The codes for habitat and food require a stage-indicator; AmPgui will ask for it; the AmPeco page gives explanations.
The fields climate and ecozone can only be filled when you know where the species occurs.
This is the reason why the websites were opened; the wiki-page typically provides the required info for geographic distribution.
Avoid overlapping codes and aim for the most simple and detailed option.
If a species only occurs in North America, choose THn, not TH, avoid the combination TH,THn
since TH already means that it occurs in both THp and THn, and replace THp,THn by TH.
EcoCodes play no role in parameter estimation, but can used in AmPtool for selection to search for patterns in parameter values.
T_typical
The typical body temperature is used to compute traits that will be presented after the parameter estimation is completed.It plays no role in the parameter estimation. The (body) temperature for temperature-sensitive data needs to be specified per data set.
0-var data & 1-var data
Numerical data consist of 0-variate data (just a number) and 1-variate data (an array of pairs of numbers). The results of the estimation will be presented in a table for 0-variate data, or in a graph for 1-variate data. Each data set requires a bibkey for its source. All "bibkey"-fields allow multiple items: separate them using ",". If you measured the data yourself in 2020, and your name is e.g. "Janssen", choose bibkeyJans2020, select bibtype mics in editing biblist,
fill in your name, year, and a note field where you specify that you measured the data yourself.
If, on the contrary, particular data is required to estimate some parameters, but unknown, guess it, use bibkey guess and
explain in a comment for that data set on what basis.
If a data set concerns time (e.g. all rates), it requires auxData of the type temp (standing for temperature).
AmPgui presents a field for it.
It might well be that the real temperature is unknown, so there is a need to guess it and to mention that in a comment for that dataset.
It is the typical body temperature that matters for endotherms, not the environmental one.
Data sets might have associated auxData (other than of the type temperature), required for the computation of the prediction of that dataset (for instance that the reproduction rate is for a particular length or weight, rather then for ultimate size). Since AmPeps writes a proposal for the predict-file (after leaving AmPgui), it is best to add auxData in the post-editing phase, since this is hard to standardize, and requires post-editing of the predict-file as well.
Uni-variate data can be typed in, space- or comma-separate, each pair on a new line, but can also be pasted in from a source. Most uni-variate data in AmP were extracted from graphs in pdf's, which were copied from the pdf using the Window's Snip & Sketch, which sets it on the clipboard, and this clipboard can be pasted in Jorn Bruggeman's PlotReader for digitalisation. (Select all data in the data-window, copy them with ctrl-c, select fixed-point, English, and 3 decimals, and paste them in the AmPgui window with crtl-v). Use the comment field for the data as much as possible, e.g. to comment on the accuracy of the data.
AmPeps checks that you entered at least one 0-variate data set and at least one data set that depends on time (so requires a temperature).
author & curator & aknowledgment
The author-field allows multiple authors, separate them by ",". The address-field is meant for the affiliation; postal details are rarely used in modern times. We expect a single email address to facilitate contact for questions about the entry. Select an AmP curator from a list. The optional aknowledgment field can be used to e.g. specify projects/institutions that supported work behind the entry. If empty, this field will not appear in the mydata-file.
COMPLETE
This indicator for the level of completeness of the data,
a number between 0 and 10, has to be estimated based on the criteria that are listed in the window.
Some data types of lower levels are typically not available, others might be guessed, so we subtract "punish" points and interpolate.
Many entries have COMPLETE = 2.5.
group plots
If your entry has several uni-variate data sets with identical x- and y-labels, they can be grouped in a single figure that compares data with predictions. The choice of the colors is from high to low in the lava-color scheme: from white to black, via red and blue. So choose first females, then males (since females will then appear in red, males in blue), or for different temperatures from high to low temperatures. This is no limit to the number of sets you can compose, but avoid using any data set twice.
The figure of a group plot can have a title and/or a subtitle, which can be specified as cell string: metaData.grp.title or metaData.grp.subtitle.
The length of this string should equal to the length of metaData.grp.sets.
Titles are part of the figure, i.e. a png file, but subtitles only appear in presentations on the website in directory entries_web.
Group plots have a legend.
The label of a data set in the legend can be specified as third cell in the label for that data set.
If not specified, the name of the data set will serve as label.
The legend can have a title.
The title of the legend is specified in txtData.label.sets as cell string of length equal to the length of metaData.grp.sets.
Some of the cells can be empty.
If the independent variables of the data sets in a group plot have the same values, consider a specification of the data sets as bivariate or multivariate data. This eliminates the need to compose a group plot. This plotting method can handle missing values.
discussion
Discussion points relate to general remarks you might have about the entry; remarks that relate to particular data are supposed to be mentioned in the comment field for that data. Since you might feel the need for a discussion during the parameter estimation session (after AmPeps is completed), the proposed mydata-file by AmPeps will have at least one (possibly empty) discussion field. Bibkeys for discussion points are facultative.facts
Facts supposed to present valuable information from the literature about the species, which is why each fact needs to have a bibkey. If no facts are filled AmPeps with remove the facts-field after leaving AmPgui, and you will not find it in the proposed mydata-file.biblist
After hittingadd bib item, hit the edit button to edit the item.
This opens an item-specific window; as soon as you replace the default bibkey "new" by an appropriate bibkey (and hit key "Enter"), a list opens to select the bibtype.
After the bibtype is selected, fields open to enter content.
Each item in a biblist is linked to a bibkey, and each data set is also linked to a bibkey.
The naming of the bibkeys is standardized by taking max 4 characters of the first author, and max 4 again for the second author, if present, and not more than 2 authors,
followed by 4 digits for the year.
Make sure that all data sets have a bibkey, and that all bibkey's have an associated bibitem in the references. The font-color in the biblist shows if some bibitems are still missing, also watch the screen-output in the Matlab-window.
AmP uses the BibTex format in the section "biblist".
BibTex converts titles of the bibtype "article" to lowercase, except the first letter.
Protect from this by placing curly brackets around letters, like {L}ineus.
Avoid nesting brackets.
Scientific names should be set in italics, like in \emph{Passer domesticus}.
Bibtex uses Latex for special characters like \'{e} for è, {\l} for ł and {\o} for ø.
After AmPgui in AmPeps
If all required fields are filled (i.e. no red buttons left) and AmPgui closed viapause/save, AmPgui does some extra checks,
but otherwise AmPeps writes the 4 sources files.
It first edits the structures and prints the mydata- and run-files.
Then it copies the pars, txtPar and metaPar structures of the most related AmP species, as identified by AmPtool function
clade,
to write the pars_init file after editing the species name.
The model type is read from metaPar, which dominates the selection of the code that is used for the specification of the predict-file from the
structure DEBtool_M/lib/pet/prdCode.mat.
After that, the auxiliary parameters of the pars_init file are edited to match the needs of the predict-file.
During the process, it checks and completes fields, all automatically after exiting the AmPgui.
AmPeps writes the 4 source files and deletes the data-structures, since these structure are re-created when running the source files during the estimation process.
AmPeps opens the resulting 4 source-files in the Matlab editor for post-editing as final action of the Matlab function AmPeps. Consult source files of other entries for inspiration of further editing, such as adding data types that were not included in AmPgui.
AmPeps post-editing phase
The post-editing phase uses the Matlab editor. This phase has less restrictions and allows, e.g., the addition of new data types in the mydata-file, which also requires code for the computation in the predict-file and, possibly, the addition of new parameters in the pars_init-file. The initiation phase assumes that data are in the preferred units (d, cm, g, J, K). If a data set actually uses e.g. years, rather than days, you need to convert to days in this post-editing step, by e.g.data.tWw(:,1) = data.tWw(:,1) * 365;.
Notice that all parameters in the pars_init file use the preferred units, so does the predict-file.
If, for some reason, it is really important to deviate from this choice, and the mydata-file uses different units, there is a need to edit the predict-file.
The units that the predict file uses are specified in the comment for each assignment of variables.
If AmPeps was unable to specify the required code in the predict-file for certain data sets, as specified in the mydata-file, the missing specification is identified,
and you have to add the code in the predict-file.
Watch the red colors in the Matlab-editor for the need of further editing.
See further the "AmP estimation" page.
AmPimport: modify a mydata-file
AmPeps can also be used to modify an existing mydata-file, e.g. if you forgot something, and/or generate the pars_init-, predict- and run-files withAmPimport('my_pet'),
where my_pet is replaced by the name of your species.
This function only uses the mydata-file, first looks for it in the current directory and, if absent, copies it from the AmP collection.
It will start AmPeps automatically, exit AmPgui via pause/save.
This route is not meant to prepare a modified version of an entry.
This can best be done in the post-editing phase by typing AmPeps in the Matlab window, fill the species-field for the entry that you want to modify
and hit OK.
The 4 source files will then be downloaded from the AmP collection and opened in the Matlab editor.
If you generated a mydata-file via AmPeps and want to add/modify it, only use AmPimport if the resulting mydata-file otherwise looks OK.
If not, the best route to proceed it to start AmPeps and hit button resume; this bypasses the changes AmPeps made on the previous results of AmPgui.
In case of errors
The process to create the 4 source files is rather complicated behind the screen. Although we did test the code, errors may still occur since the number of possible combinations is enormous. If so, please email the fileresults_my_pet_backup.mat (with my_pet replaced by a species name) to salm.kooijman@gmail.com.